How Food Is Made: Cooking Techniques
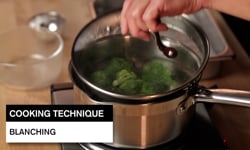
| Title: | Blanching |
|---|---|
| Run Time: | 43 seconds |
| Transcript: | Blanching is the process in which vegetables are scalded with boiling water or steam to help retain color, flavor, and nutrients. Bring a pot of salted water to a boil. Then add the vegetables. Boil the vegetables until their color brightens and their texture softens slightly. In most cases, this will take about 40 seconds. Remove the vegetables from the pot and place in a bowl of ice water to halt the cooking process. Allow the vegetables to remain in the ice water for at least as long as they were in the boiling water. |
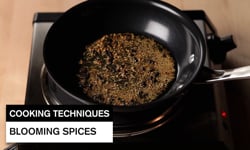
| Title: | Blooming Spices |
|---|---|
| Run Time: | 81 seconds |
| Transcript: | “Blooming spices\" means to heat spices in oil, a process that allows the spices’ aroma and flavor to be released and intensified. This easy process infuses the oil with flavor, making it a good way to get the most out of whole spices such as seeds or pods. Here’s how to bloom spices. Begin by adding about a tablespoon of your preferred cooking oil to a skillet set over medium-high heat. Heat the oil until it is hot but not smoking, about 2 minutes. The oil should shimmer when it’s ready. If you are using whole spices, add them to the pan and then shake or stir occasionally until the spices are noticeably fragrant and small bubbles form around the spices. Remove from heat. If you are using ground spices, make a simple paste first by adding to a bowl a small amount of oil. Add the ground spices to the oil and mix to form a thick paste. Add the paste to the heated oil in the skillet, and stir until the spices are very fragrant. The seasoned oil is now ready to be used. If using whole spices, remove these before serving the finished recipe.\r\n |

| Title: | Boiling Chicken |
|---|---|
| Run Time: | 53 seconds |
| Transcript: | You can use shredded chicken for tacos, soups, barbecue sandwiches, or as a base for many other recipes. Here\'s how to do it. Place several pieces of chicken into a saucepan along with carrots, celery, onions, and a handful of peppercorns. Cover with chicken or vegetable stock and bring to a boil. Reduce the heat and allow to simmer for 45 minutes or until the fibers of the meat begin to separate. Remove one piece of chicken from the saucepan to test if it is ready to be shredded. Use two forks to pull apart the fibers of the meat. If the fibers aren\'t separating, just return the chicken to the saucepan and continue to simmer until tender. If it shreds without resistance, you can retrieve the rest of your chicken for shredding. |

| Title: | Braising |
|---|---|
| Run Time: | 100 seconds |
| Transcript: | Braising is a method used to break tougher meats down into a fork-tender consistency. It’s most commonly used to prepare beef and pork roasts and involves a two-step process of searing and roasting. To prepare a pot roast for braising, start by seasoning it with salt and pepper, and coat it with olive oil. Allow it to rest at room temperature for at least 20 minutes. Preheat a large skillet over high heat. Coat the surface with olive oil. When the oil starts to shimmer, place the roast in the skillet and sear on all sides to form an outer crust and seal in its juices. Do not try to turn the roast if it sticks to the surface. Wait until it releases with ease before turning. Once seared on all sides, place the roast into a Dutch oven. While the skillet is still on the heat, add a sliced onion and a handful of whole garlic cloves to the skillet. Scrape up the leftover meaty brown pieces with the spatula so they can mix in with the oil and juices of the onions. Once the onions are translucent, add the mixture to the Dutch oven with the roast, along with a broth or sauce of choice. Place the roast into an oven preheated to 300 degrees Fahrenheit. It’s at this point that the fibers of the roast will break down and the meat will start to loosen from its mass. Allow the roast to cook for three hours or until the meat is fall-apart tender. |

| Title: | Breading Meat |
|---|---|
| Run Time: | 61 seconds |
| Transcript: | Breading is a technique used when frying or baking meat. It creates a crunchy and flavorful crust that helps hold in the meat’s juices. Start by preparing your meat. In this example, we’ll use thinly sliced chicken. The breading process uses stations of dry and wet ingredients. At the minimum, this involves one station of flour mixed with desired seasonings and one station of beaten egg. If desired, you can make up a third station consisting of a coarser dry ingredient such as crushed corn flakes. To bread the chicken, start by placing it in the flour mixture to dredge on both sides. Transfer it into the beaten eggs to coat evenly in the mixture. Finally, if you have a third station, transfer the chicken into the coarse ingredient to cover the egg mixture on both sides. Once evenly coated, the chicken is ready for frying. |

| Title: | Browning Butter |
|---|---|
| Run Time: | 75 seconds |
| Transcript: | Browning butter is as easy as can be. Just by melting butter and burning it ever so slightly, you can bring out a nutty, toasty flavor, and a wonderful aroma. Here’s how to brown butter. All you need is small skillet, and a spatula or metal whisk. Heat the skillet on medium heat, and add in slices of soft butter. It helps to use a light-colored pan, so you can better see the brown color of the butter as it cooks. Stir the butter until the slices have melted evenly. The liquid butter will foam up a bit at first, then subside. Let the butter cook for several minutes, stirring occasionally. Soon you’ll notice solids beginning to form at the bottom of the skillet. What you’re seeing is the milk solids starting to burn. This is what gives brown butter its wonderful flavor. Continuously stir the brown bits into the liquid until the liquid turns light brown. Don’t overdo it. Cooking the butter too long will make it burnt and bitter. Remove the skillet from the heat when the butter is a medium golden-brown. It’s ready to go. Browned butter will enhance any recipe that calls for melted butter. Or use it on seafood, baked potatoes, or vegetables for a rich, savory kick.\r\n |
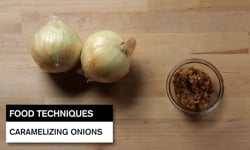
| Title: | Caramelizing Onions |
|---|---|
| Run Time: | 67 seconds |
| Transcript: | Caramelized onions make a great topping for burgers or pizza. The cooking process takes some time but with very little effort it turns the flavor from intense and overpowering into savory and sweet. When caramelizing onions, low-and-slow is the name of the game. Here’s how to caramelize an onion. Start by cutting down one whole onion by slicing it into strips. Heat a sauté pan with olive oil on medium heat, and stir in the sliced onions. Sprinkle the onions with salt. This will help them to retain their moisture. Cook them for about 5 minutes on medium heat. The onions will soften and turn somewhat translucent. Reduce the heat to medium-low and cook for another 10 to 15 minutes. Stir and toss occasionally to prevent sticking. The onions will begin to brown. Stir in a little water from time to time if your onions are sticking to the pan. This will keep them from burning. When your onions are evenly golden-brown, they’re ready to serve, or to cool and save for later. |
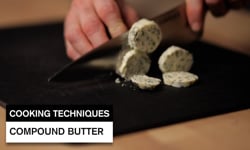
| Title: | Compound Butter |
|---|---|
| Run Time: | 74 seconds |
| Transcript: | Compound butter is nothing more than a softened butter whipped with your favorite spices. Whether sweet or savory, it’s a simple way to add big flavor. Here’s how to make compound butter. Begin by assembling the following ingredients: A dish for mixing; a fork; a sheet of plastic wrap; 1 stick of softened unsalted butter; 2 tablespoons chopped herbs; ½ teaspoon salt; and ½ teaspoon black pepper. Using your fork, mash up the butter in your dish until it’s soft and broken down. Sprinkle in the chopped herbs, the salt, and the ground black pepper. Continue to whip the butter, mixing in the spices evenly. If saving the butter for later, transfer onto a sheet of plastic wrap. Wrap the butter and roll into the shape of a log. Twist the ends to close, and set it aside for when your dish is ready to serve. A savory compound butter makes a great spread for fresh bread, or for meat, potatoes or veggies. For toast, waffles, or pancakes, try compound butter with cinnamon, and brown sugar and honey.\r\n |

| Title: | Deep Frying |
|---|---|
| Run Time: | 93 seconds |
| Transcript: | Deep frying is a cooking technique used to create a crispy exterior and a juicy interior. It involves submerging food in hot oil, essentially searing or caramelizing the outer layer. Deep frying cooks items quickly and is often used to prepare convenience foods such as donuts, French fries, and potato chips. It is a popular cooking method in many world cultures. Here’s how to deep fry French fries. Start with potatoes that have been peeled, rinsed, cut into sticks, and submerged in water for several hours. Before frying, make sure to blot the potatoes with paper towel to absorb excess water. Then add a few inches of oil to a heavy pot and heat to 300 degrees Fahrenheit. Use a deep frying thermometer to check the temperature. Add the potato sticks and cook for about 5 minutes—until they are softened but not yet browned. Cook in batches, draining each batch on paper towels when finished. Once all potatoes have been cooked, turn up the heat so that the oil reaches 400 degrees. Once the oil is at temperature, add the potatoes, again in batches, and fry until they are crisp and golden. Drain on paper towels and sprinkle with salt while they are still warm. To dispose of used cooking oil, allow it to cool, and then pour it into a non-recyclable container with a lid. Put it in the freezer to harden. Once the oil has solidified, simply throw it in the garbage.\r\n |
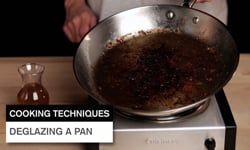
| Title: | Deglazing a Pan |
|---|---|
| Run Time: | 63 seconds |
| Transcript: | After you’ve roasted or pan-fried a piece of meat, the pan will be coated with a flavorful residue. Don’t let these tasty bits go to waste: Incorporate them into a quick and easy pan sauce. This process is called deglazing. Here’s how it’s done. With the pan still on the heat, pour in a bit of chicken, beef, or vegetable stock—enough to cover the bottom of the pan. Cooking wine or vinegar can also be used. Toss in some salt, garlic, minced shallots or any number of other ingredients to further enhance the flavor. Allow the mixture to come to a boil and then use a wooden spoon to scrape the bottom of the pan, releasing the brown bits and integrating them with the boiling liquid. The liquid will absorb the flavor. Reduce the heat and simmer, bringing the pan sauce to serving temperature. The final mixture becomes a simple pan sauce to serve over the roasted meat. |
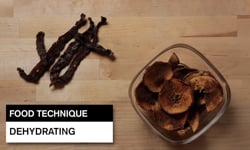
| Title: | Dehydrating |
|---|---|
| Run Time: | 80 seconds |
| Transcript: | Dehydration uses low heat to dry out food. Removing a food’s moisture restrains the growth of microorganisms and is one of the oldest food preservation methods in human history. To dehydrate fruit such as apples, you’ll want to slice them very thinly. Pluck the stem from the apple and turn it on its side. Hold the apple firmly and use a sharp knife to slice the apple into even quarter-inch slices. Next, spread the apples onto a baking sheet. If desired, season with cinnamon or brown sugar. Place the apples into an oven preheated to 175 degrees Fahrenheit for 6 to 8 hours. Allow to cool. To dehydrate beef into jerky, start by marinating thinly sliced cuts of top round for at least 3 hours and up to overnight. Arrange the cuts on a roasting rack placed on top of a baking sheet and place in a 175 degree oven for 3 to 4 hours or until dry and leathery. Use the oven door to fan the jerky occasionally. Allow to cool before cutting the meat into bite-size pieces. |

| Title: | Frying |
|---|---|
| Run Time: | 77 seconds |
| Transcript: | Frying is a popular method of cooking fish such as walleye. To prepare walleye fillets for frying, start by mixing flour with seasoning salt in one large bowl, beaten eggs in another, and panko bread crumbs in another. With each fillet of walleye, place it into the flour mixture for dredging on each side. Then transfer into the beaten eggs. Once coated on both sides, transfer the fish into the bowl with panko bread crumbs. Once evenly coated, transfer the walleye onto a plate to await frying. In a large skillet, preheat cooking oil to 350 degrees Fahrenheit. In batches, gently place the walleye into the oil. Allow to cook for 4 minutes, turning once with a pair of metal tongs. The outer coating should reach a golden brown color. Remove the walleye from the oil. Place onto a paper towel-lined plate to absorb any excess oil and allow to cool. Serve hot with a squeeze of lemon and season to taste as needed. |

| Title: | Glazing Vegetables |
|---|---|
| Run Time: | 69 seconds |
| Transcript: | Glazing is one easy technique for making a savory sauce for root vegetables—like carrots, parsnips, or pearl onions. A glaze is basically a reduction sauce; it cooks down and forms a light coating on the vegetables. Glazing imparts a subtle sweetness, glossy sheen, and pleasing texture. It takes only a few steps. With your sauté pan on medium heat, add in your vegetables. Next, pour in a liquid that will boil down to make the glaze. Broth or white wine are common choices. Pour in enough to halfway submerge your vegetables. Add some butter, sugar, and salt. As the liquid boils down and evaporates, the vegetables will soften and turn glossy. Cook the vegetables to your liking. Cooking longer will caramelize them. If caramelizing your vegetables, remember to deglaze your pan with a little broth or wine. It helps remove the burned stuck-on bits, and puts some of that flavor back into your vegetables. |

| Title: | Grinding Spices |
|---|---|
| Run Time: | 61 seconds |
| Transcript: | Many spices are better enjoyed cracked or ground. Here’s how to prepare them. Begin with fresh or toasted dried spices. To crack spices such as peppercorns, put them in a plastic freezer bag and press them with a rolling pin until they crack. For finer granularity, crush them in a mortar and pestle. You can also grind them to your level of fineness using a coffee grinder. Make sure to use one reserved just for spices in order to keep the flavors true. For a powdered spice, sift the ground spices through a fine mesh strainer. |
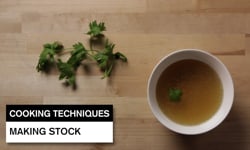
| Title: | Making Stock |
|---|---|
| Run Time: | 80 seconds |
| Transcript: | Chicken stock is made from the meat and bones of a chicken, as opposed to broth, which is made with just meat. You can make a delicious homemade chicken stock using a leftover chicken carcass and a handful of vegetables. Here’s how it’s done. After cutting up a raw or cooked chicken, take the leftover bones and extra bits of meat and skin and put them in a stock pot. Break down vegetables such as celery, onion, and carrots into chunks. Add them to the pot along with parsley and whole peppercorns bundled in cheesecloth and tied with butcher\'s twine. Be sure not to cut the butcher\'s twine too short so you can easily fish it out later. Cover with water, but do not season yet. Bring the mixture to a boil over high heat. Once boiling, turn the heat down to low and partially cover the stock pot. Allow to simmer for around 4 hours to make chicken stock, or even longer to make a concentrate. Once the stock is cooked, remove the bones and vegetables. Then run the stock through a fine mesh strainer to remove any additional solids. Allow to cool, and then pour into jars for storage. Stock will keep in the refrigerator for about a week or in the freezer for several months. |

| Title: | Melting Chocolate |
|---|---|
| Run Time: | 81 seconds |
| Transcript: | Melted chocolate is a luxurious treat, used to top desserts from cookies to fresh fruit. This easy method for melting chocolate does not require a double boiler; instead it uses two pans every cook has at home. Here’s how to melt chocolate. Begin with your desired quantity of chocolate. You can use chocolate chips, chocolate chunks, or roughly chopped baking chocolate. Place the chocolate pieces in a small saucepan. Next, take a skillet that is larger than the saucepan and add enough water to cover the bottom, about a half inch. Bring the water in the skillet to a simmer over medium heat. Do not allow it to boil. Carefully place the saucepan into the skillet. The heated water will warm the bottom of the saucepan and allow the chocolate to begin melting. Gently stir the chocolate with a wooden spoon or rubber scraper as the pieces begin to melt, and stir continuously as they melt together. Once the chocolate is completely melted, remove the saucepan from the skillet. The melted chocolate is now ready to use. If the chocolate hardens before you’re done using it, return the saucepan to the skillet and heat again, stirring constantly. Save any unused chocolate by pouring it onto a piece of parchment and placing in the refrigerator.\r\n |
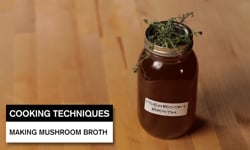
| Title: | Mushroom Broth |
|---|---|
| Run Time: | 100 seconds |
| Transcript: | Mushroom broth is a versatile cooking staple that can serve as a soup base or in place of water to add extra flavor to rice and sauces. Most any mushroom can be used to make broth, and the wider the variety, the richer and more complex the broth. Roasting the mushrooms beforehand gives the broth a deeper, meatier flavor. Here’s one way to make mushroom broth. Begin by assembling the following ingredients: 1 pound of mixed-variety mushrooms and stems, chopped; 1 medium yellow onion, skin on and quartered; 3 cloves of garlic, skin on and smashed; 1 tablespoon of olive oil; 8 cups water; ¼ cup dry white wine; and 6 sprigs of thyme. Spread the mushrooms, onion quarters, and smashed garlic in a single layer on a baking sheet. Drizzle with olive oil and roast for 20 minutes at 425 degrees Fahrenheit. Add roasted mushrooms, onions, and garlic to a heavy pot. Add the water, wine, and thyme sprigs, and bring to a boil. Then reduce heat to low, cover loosely, and simmer for about 45 minutes. Remove the broth from heat and allow it to cool. Then strain to remove all solids and use immediately or decant the broth into jars for storage. Mushroom broth will keep in the refrigerator for about a week or in the freezer for several months.\r\n |
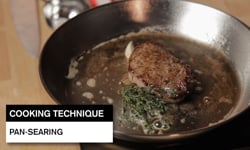
| Title: | Pan-Searing |
|---|---|
| Run Time: | 85 seconds |
| Transcript: | Pan-searing is a technique often used on meats such as steak as well as on poultry, fish, or seafood. It uses high heat to create a thick crust that seals in juices. To prepare a piece of meat for pan-searing, start by seasoning it with kosher salt and freshly ground pepper. Allow it to sit at room temperature for at least 20 minutes. Preheat a skillet to very high heat, add a small amount of olive oil to the skillet, and swirl to ensure even coverage. Heat the oil until it is shimmering and fragrant. Use a pair of tongs to set the meat into the skillet. Allow the first side of the meat to cook until a crust has formed. If it remains stuck to the pan, the crust is not yet formed. Don’t move the meat until it releases from the bottom of the pan with ease. Once a crust has formed, flip the meat to cook the other side. If desired, add a dollop of butter to the skillet along with a clove of fresh garlic and thyme sprigs. Once the butter is melted, use a spoon to baste it over the meat. Continue to cook until the meat has reached the desired doneness. Cover it with aluminum foil and allow it to rest for 10 minutes. After 10 minutes, remove the aluminum foil. The meat is now ready to be plated and served. |
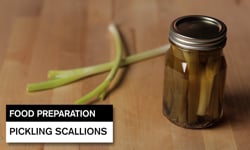
| Title: | Pickling Scallions |
|---|---|
| Run Time: | 90 seconds |
| Transcript: | With the right container and combination of spices, you can pickle all sorts of ingredients. To pickle scallions, start by trimming the tops and bottoms. Cut the scallions in half crosswise and place them in a 1-pint sealable jar. Next, add spices. There are many spice combinations you can use to create different flavors, but two common pickling spices are whole peppercorns and mustard seeds. Briefly toast your spices one at a time in a skillet until fragrant. This will draw out more of the spices’ flavors and aromas. Remove from heat, allow to cool slightly, and then carefully deposit them into the jar with the scallions. To make a pickling brine, combine equal parts water and distilled white vinegar in a saucepan and bring to a boil. Carefully pour the brine into the jar until it covers the scallions by 1 inch. Season the mixture with kosher salt as desired. Seal the jar and place in the refrigerator to chill for at least 1 day. |

| Title: | Pie Crust |
|---|---|
| Run Time: | 97 seconds |
| Transcript: | Homemade pie crust is easy to make and uses just a few ingredients most cooks have on hand. With a little prep time figured in, this crust will result in a pie you can say is truly homemade. Here’s how to make pie crust. Begin by assembling the following ingredients: 2½ cups all-purpose flour; 2 teaspoons sugar; 1 teaspoon salt; ½ cup butter, unsalted, cold, and cubed; ½ cup vegetable shortening, cold and cut into a few pieces; and ½ cup ice water. To begin, add to large mixing bowl the flour, sugar, and salt and whisk to combine. Add the cold cubed butter and vegetable shortening. Use a fork or pastry cutter to cut them into the dry ingredients until small, pea-sized crumbs are formed. Next, slowly drizzle in the ice water one tablespoon at a time and gently mix in. Once the dough begins to come together, turn it out onto a lightly floured surface and form into a ball. Cut the dough in half and shape into two discs. Cover each disc tightly with plastic wrap and refrigerate for one hour.\r\n |

| Title: | Poaching Fish |
|---|---|
| Run Time: | 66 seconds |
| Transcript: | To poach is to cook by simmering in a small amount of liquid. This easy method is good for fish, keeping it moist and flavorful while retaining nutrients. Poaching works well with fresh or frozen fish and is best with fish steaks or whole fish, which keep their shape and resist crumbling. For the poaching liquid, use water flavored with lemon and herbs. Here’s how to poach fish—in this case, a yellowfin tuna steak. Begin by thoroughly rinsing and patting fish dry with paper towels. Place the fish in a large saucepan and add enough poaching liquid to cover the fish. Bring the liquid to a simmer over medium heat, being careful not to boil the liquid. Cook the fish for 10 minutes or until the center appears opaque and flakes easily with a fork. When the fish is cooked through, remove it from the water with a slotted spatula. Serve the fish immediately or chill and serve later.\r\n |
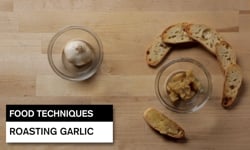
| Title: | Roasting Garlic |
|---|---|
| Run Time: | 61 seconds |
| Transcript: | Oven-roasting softens the astringent flavor of raw garlic to create rich, toasty morsels that can be added to soups, breads, salad dressings, and marinades. Here’s how to roast garlic. Cut off the top third of the head of garlic and discard. Then transfer the garlic to a baking sheet lined with aluminum foil, Add salt and pepper, and drizzle olive oil over the garlic. Wrap the head of garlic in aluminum foil and bake for 30 to 40 minutes at 400 degrees Fahrenheit, or until the garlic skin is brown and the cloves inside are soft to the touch. Squeeze the cloves from the skin. They can be used right away as a savory spread on crusty bread, or you can allow them to cool; then store them in a sealed container. They can be refrigerated for up to two weeks. |
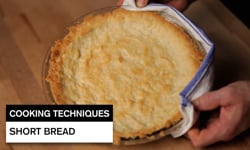
| Title: | Short Bread |
|---|---|
| Run Time: | 83 seconds |
| Transcript: | Shortbread crust is a versatile choice when making pies, cheesecakes, and many other desserts. It is lightly sweet and buttery, and uses just four basic ingredients. Here’s how to make shortbread crust. First, preheat oven to 350 degrees (175 degrees C). Then assemble the following ingredients: 2 cups all-purpose flour; ¼ teaspoon baking powder; 1 cup butter, at room temperature; and ½ cup confectioner’s sugar. Begin by mixing together the flour and baking powder in a small bowl. In a separate large bowl, add the butter and confectioner’s sugar and beat together with a hand mixer until light and fluffy. Add the flour mixture into the butter mixture and blend with hand mixer until crumbly. Using dampened hands, press the mixture into the pie plate. Now bake the crust in the preheated oven for 12-15 minutes, until lightly browned. Let crust cool completely before going on to make pie, cheesecake, or other chosen recipe.\r\n |

| Title: | Steaming |
|---|---|
| Run Time: | 36 seconds |
| Transcript: | Steaming is a technique that cooks vegetables without loss of crispness or color. To steam vegetables such as broccoli, carrots, or asparagus, start by bringing 1 inch of water to a boil in a saucepan. Then place a collapsible steamer filled with prepared vegetables into the bottom of the pan and cover. Steam them for 5 or 6 minutes or until the vegetables are brightly saturated in color and have reached the desired level of tenderness. Use a pair of tongs to remove the vegetables from the pan. |

| Title: | Stir-Frying |
|---|---|
| Run Time: | 62 seconds |
| Transcript: | Stir frying is a technique in which food is cooked by being stirred in a small amount of oil over high heat. The technique can be used to fry vegetables, meat, or anything else you choose. To make a vegetable stir-fry, start by heating cooking oil in a wok or large skillet over medium-high heat. Once the oil is shimmering, add aromatics such as minced garlic or onion and allow to cook until fragrant. Then add one vegetable at a time, starting with those that take the longest to cook. For example, vegetables such as carrots take longer to cook than vegetables such as snow peas. As with the onions and garlic, make sure to keep the vegetables moving. When the vegetables are cooked to your preferred doneness, add more seasoning or flavored sauce. Stir fry briefly to allow flavors to combine. Then plate, garnish, and serve. |

| Title: | Toasting Nuts |
|---|---|
| Run Time: | 33 seconds |
| Transcript: | Oven-roasting is a quick and easy way to enhance the flavor and crunchiness of walnuts, almonds, pecans or other nuts. Here’s how. Spray your baking sheet with cooking oil. Then arrange the nuts on the baking sheet. Pop them into an oven preheated to 350 degrees Fahrenheit for about 5 minutes. You’ll know the roasted nuts are ready to serve when you can you smell their aroma. |

| Title: | Toasting Spices |
|---|---|
| Run Time: | 62 seconds |
| Transcript: | Many dried spices benefit from a light toasting before use. The heat releases the spices’ aroma and enhances their flavor. Spices that are improved by toasting include peppercorns, star anise, cinnamon, cumin, coriander, juniper berries, cloves, mustard seeds, and fennel seeds. Here’s how to toast spices. Toast each spice separately, one at a time. Heat a small pan over medium heat. Add dried whole spices to the pan and shake or stir to prevent burning. Small, thin-skinned spices will start to brown and become fragrant after about a minute. Larger spices with thicker skins will take a bit longer. Toast, shaking or stirring, until the spices give off a rich scent. Remove your toasted spices from the heat, allow to cool completely, and then store in a sealed container. Use them whole, or crush or grind them for a finer texture. |
| Title: | Vegetable Broth |
|---|---|
| Run Time: | 127 seconds |
| Transcript: | Vegetable broth is a versatile cooking staple that can serve as a soup base or in place of water to add extra flavor to rice and sauces. Most any vegetable can be used to make broth. Typical ingredients include carrots, celery, onion, and sturdy greens such as kale or collards. It can be easily made using vegetable scraps left over from other recipes. Here’s one way to make vegetable broth. Begin by assembling the following ingredients: 1 tablespoon of olive oil; 1 medium onion, skin on and finely chopped;\r\n4 cloves of garlic, skin on and finely chopped; 4 medium carrots, finely chopped; 4 stalks of celery, finely chopped; 2 teaspoons of sea salt, divided;\r\n2 teaspoons of black pepper, divided; 10 cups of water; 1 cup of chopped sturdy greens; ½ cup of chopped fresh flat-leaf parsley; 4 sprigs of fresh thyme or 1 tablespoon of dried thyme; 4 sprigs of fresh rosemary or 1 tablespoon of dried rosemary;\r\n2 bay leaves; 3 tablespoons of nutritional yeast; and 5 tablespoons of tomato paste. Heat a large pot over medium heat. Once hot, add a drizzle of olive oil and then the sturdier vegetables such as carrots, onion, garlic, and celery. Add half the salt and pepper and sauté for about 5 minutes or until the vegetables are softened and slightly browned. Then add the water, the greens, the herbs, and the remaining salt and pepper. Bring the mixture to a boil. When the broth has reached a rolling boil, cover loosely and reduce heat to low. Add the nutritional yeast and tomato paste and stir to combine. Allow to simmer for 1 hour. Then taste and adjust seasoning if needed. Remove the broth from heat and allow it to cool. Then strain to remove all solids and use immediately or decant the broth into jars for storage. Vegetable broth will keep in the refrigerator for about a week or in the freezer for several months.\r\n |